Behind The Scenes Of Making a Podcast – Episode Highlights:
- The 30 tools & resources that we use every week to systemize the Inspiring Innovation Podcast
- The system behind Inspiring Innovation – the actions we take, step by step, to go from “We should have James Schramko on the show”, to a released episode
I get asked very often what resources we use on Inspiring Innovation for creating our episodes, editing and post production, social media, and for managing all of our tasks and projects.
I feel it’s time for a behind-the-scenes look – where I will walk you step by step through all the steps included in our episode creation process. Basically, you’re about to see everything that happens from the second an Inspiring Innovation Podcast episode is created, to it being released, downloaded, and being played in your earbuds.
Setting Up The Podcast Interview
The first step, when we set up a podcast episode, is obviously to get an interviewee.
I often get pitched by people who want to be on the Inspiring Innovation Show. We also work with several media agents that pitch interviewees to us.
![]()
We use resources like HARO (Help A Reporter Out), where people can pitch themselves to the Inspiring Innovation Show. But let’s pretend that for this episode that we’re talking about – I wanna get a real big name on the show.
While most people have a contact form on their website (and that’ll be the first place I would go to pitch for an interview), there are plenty who don’t.
So how do you contact these people?
And let’s say they do have a contact form on the site, but it goest to their VA or their gatekeeper…and you can’t get past them?
In these occasions, I will retreat to one of my secret weapons, which is called Rapportive.
Rapportive
![]()
Rapportive is an add-on (or an extension) that you install for Gmail.
Once installed, whenever you start typing an email to someone and you put in theur email address, Rapportive will find and display their information inside the Gmail window:
Where do they live? What state? What country? What is their Twitter account? What is their LinkedIn account? What is their Facebook account? What do they look like?
Yes, it even pulls up a photo. It’s that cool!
Now, it doesn’t work for all emails in the world, but it works for a great percentage of them.
How I use Rapportive on a day-to-day basis:
- When I write a reply to an email, Rapportive will pull up their photo and personal details.
This allows me to reply with a much more personal touch – because now I know what the person I’m emailing looks like, where they work, and where are they from.
If you’ve received an email from me and wondered, “how the heck did he know I’m in Austin?!”… Rapportive is my secret 🙂
- But much more jedi-like, I’ve used this to find the emails of some really big entrepreneurs.
How? I open Gmail, and click “Compose”. The I guess an email address based on the name of the target interviewee. If Rapportive updates and shows his personal details – I know I found his personal address. If Rapportive shows nothing, I try other variations ([email protected], [email protected], [email protected], etc. etc.). It doesn’t always work, but it works often enough! 🙂
In any case, wether I pitch someone, or someone pitches himself to me – the next step is to schedule the interview.
ScheduleOnce
![]()
I was first introduced to this by Antonio Centeno from Real Men Real Style. It was love on first sight, and I since referred many of my friends to this service (including John Dumas, who now uses this tool to schedule all of his interviews!).
With ScheduleOnce, you define your blocks of availability – which times of which days are you willing to have interviews on. Then it integrates with your actual Google calendar. So everything that is already scheduled in your calendar is blocked out.
The available times that are left in the intersection between the times that you defined and the times when you don’t have any meetings in your calendars, are the times that ScheduleOnce will show to your guest when he comes to schedule an interview.
The cool thing is, that no matter where you are and where they are around the world – ScheduleOnce will only show them your actual availability in THEIR Timezone.
No more timezone miscalculations, no more confusion, and no more time
wasted! Your interviewee will just select the time that they want and — BAM — an appointment is added in their Google calendar to your Google calendar and you’re all set for an interview.
SWEET!
IFTTT and Asana
Previously discussed last week on my episode with Erin Smith, IFTTT (which stands for “If This Then That”) is a tool that allows you to define that if a specific trigger happens (example: you receive an email confirming an interview), then a specific action is automatically taken.
So I have a trigger saying, if I receive a message from ScheduleOnce to my email saying that a podcast interview has been scheduled, then I have a task is created for me in Asana (the project management software that we use), with all the details of the interview:
- When is it going to happen?
- The name of the interviewee.
- His Skype details
- Etc.
This task is very simple: Create a project for this episode.

Now, as I said, Asana is the project management system that we use. Once IFTTT creates a task in Asana, the next day – when I wake up and check out my “to-do” for the day – I will see this task saying “Create a Project for this interview”.
So I will click on my template “IIP episode” project, that has all the tasks that need to happen from the second the interview is scheduled to the second it released on iTunes or Stitcher (or whatever app you’re using to tune in with), including who’s in charge of each step — is it me, is it Rose (my VA) or is it the interviewee — and deadlines.
In one click I duplicate our template project, copy the details IFTTT forwarded, update the deadlines according to the actual interview date and the planned release date — and the project is ready to go.
From this moment on, me and my team will basically follow the Asana project, one task after the other, until the episode is ready. We don’t need to think about anything. We don’t need to plan anything. It’s all there, pre-planned and actionable.
If you think about it, the only manual action I needed to take to make all this possible, was pitching for the interview – because once the pitch was accepted, I send my ScheduleOnce link, they schedule, IFTTT automatically creates a task to set up the project in Asana, and from there onwards – everything is streamlined.
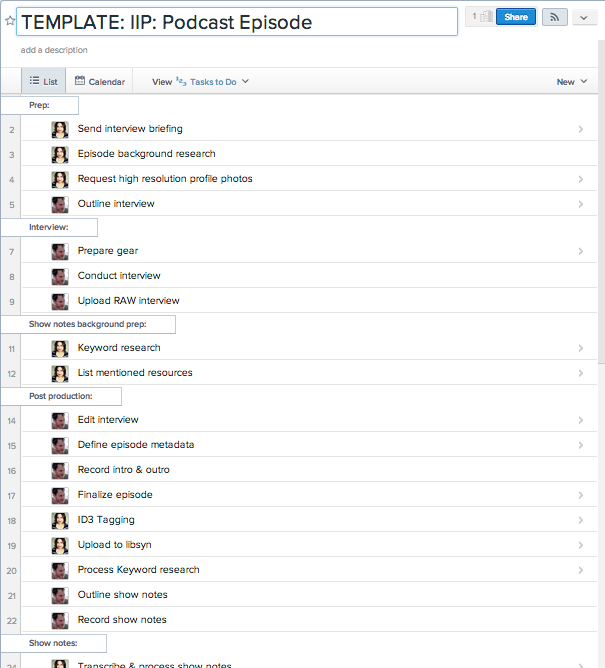
Here’s a screenshot showing a part of our Asana project template:
Preparing For The Interview (& Making The Podcast Much Better!)
Background Research
Looking at my podcast episode project template above, you’ll see that the first step is defined for my VA and it’s called, “send interview briefing.”
So my VA will see this task and send my interviewee an interview briefing (based on a template that we have), that explains the format of the interview, what kind of questions are you gonna be asked, and some legal stuff.
The next day, again – as you can see in the screenshot above – she will send an email requesting them for a high resolution profile photo that we can use in the Inspiring Innovation Magazine and in the podcast show notes.
Then, she will conduct background research about the interviewee. We have a complete checklist for how we research an interviewee before he comes on the show, and she will simply start working through that.
Once she’s done with the background research, I will be triggered with a task of outlining the interview.
4MAT and SPIN Framework
Once I read the background research, I go ahead and outline the interview.
These days, I use two frameworks for my outlining, both recommended to my by James Schramko.
First, I outline the interview using the 4MAT framework – breaking the interview down to 4 sections WHY (are we talking about this), WHAT (is the story / are we talking about), HOW (will you do it) and WHAT IF (answering questions).
For the WHY section, I actually dig deeper using another framework James has recommended, called SPIN. SPIN stands for Situation, Problem, Implication and Need, and was developed by Neil Rackham.
I use SPIN to describe (at the beginning of the episode) today’s subject – why we are talking about it, and why should you listen.

How? It’s quite simple.
I take a piece of paper and write:
- Situation:
- Problem:
- Implications:
- Need:
Then, next to each letter, I add some bullet points that I want to remember to talk about.
For example, for my interview with Erin Smith last week, where we discussed monetization, my SPIN was:
- Situation:
- You are an entrepreneur
- / side hustler
- / aspiring entrepreneur
- Problem:
- You have ideas, maybe even some products, but aren’t sure how to monetize well
- Implications:
- You cannot leave the 9-5
- You cannot create the business of freedom that you want
- You’re feeling stuck
- Need:
- A step by step plan on how to take an idea and turn it into a prosperous business.
As I mentioned, 4MAT includes WHY, WHAT, HOW, WHAT IF, and the SPIN framework covers my “WHY” for the episode. Then I’m left with making a few notes for:
- WHAT
What is the story? Here I add a few bullet points of interesting facts and important milestones from the background research I’ve read - HOW
This is for the stage in the interview where I try to get a step by step action plan from my interviewee once we covered their background story. I write down all the points that are important for me to make sure my interviewee covers. - WHAT IF?
This is for any questions I might have about the outlined process. Usually I leave this empty, and fill it in with the questions that pop into my head while the interviewee is talking (instead of interrupting him)
This entire outlining process takes me 15 minutes or less, can be done on a post-it notes, and makes the interview well structured and effective. Implementing this outline step has saved my 2-4 editing hours per episode!
Recording The Podcast Interview
Skype, eCamm Call Recorder (Mac) and Pamela Call Recorder (Windows)
When the day of the interview comes, I prepare all my gear. And yes, I have a task in Asana called “Prepare Gear” which has a checklist of all the knobs I need to turn!
Then, I conduct the interview, following the SPIN and 4MAT outline that I’ve made.

Even though we use professional podcasting gear, I still have (on my Mac) installed eCamm Call Recorder for Skype that records the Skype call on the computer itself – just in case our digital recorder fails, and gives me an extra backup.
eCamm Call Recorder is what I recommend all of my students who are getting started as the best Skype recording software. If you are on Windows, you might want to be looking into Pamela Skype Recorder.

Once the interview has been recorded, I will take the raw file as it is and upload it into a task in Asana called “Upload Raw Interview.” (pretty self descriptive, huh?).
Once I upload the file, Asana will notify Rose automatically, and she in turn will listen to the entire raw episode, making a list of all the resources that were mentioned. That’s the “mentioned resources” list that you will find in all of my episodes.
Podcast Post Production: Creating Good Episodes and Great Show Notes
Google Keyword Planner, Market Samurai and Moonsy
Once Rose completes the mentioned resources section, the next task she has in our template is keyword research. She uses Google Keyword Planner and Market Samurai for that.

We use Market Samurai to find and choose the keywords that we actually have a good shot of ranking highly for.
If you don’t want to splurge on Market Samurai, you can do some of the research for free using a tool called Moonsy Domain Authority. It will let you know how authoritative are other websites that you are going to compete against for a given keyword.
(Of course, Domain Authority is only one of many SEO factors, but I thought you’d like to know about Moonsy 🙂 )
At the end of this process, Rose will post on Asana the results of her keyword research – the main keyword we will be targeting with this episode, as well as the long-tail or satellite keywords that are relevant.
All this is done so we can maximize the organic traffic that Google will give us for this podcast episode.
Audacity and Adobe Audition

While Rose does her part, I will start editing the interview itself, using Audacity.
I used to use Adobe Audition, and I would say that it is a much better piece of software and it’s a lot more fun to use than Audacity. But Adobe wanted me to pay over $2400 for using it (instead of the US price which is $19 a month), so I went back to Audacity.

With the right plugins, Audacity can actually create some great sound even though it’s 100% free. And if you want to use Audacity to its full potential, check out PodcastIncubator.com – and I will be happy to show you how 🙂
Once I edit the interview, I sit down and define two episode titles.
Why two?
- First title is the title that will show on the podcast feed (in iTunes, Stitcher, etc.). This title has to be intriguing and make you want to listen to the show.
- Second title is the title that will show on our WordPress site. This title has to be optimized for SEO in order to increase the organic reach of the show.
Evernote

Once I have the title and the general concept, I will sit down and outline the show notes for the episode:
I will define my sections, titles, subtitles, and add some bullet points for the key points I want to cover. I write this outline in Evernote, and you’ll see why in a second!
Here’s the thing:
I hate blogging.
I don’t enjoy writing.
In fact, when I have a task like “sit down and write”, I procrastinate on it like it’s nobody’s business.
When Srini Rao challenged me to write every day for 15 minutes first thing in the morning, those were the most un-productive days I have ever… ever had. It turns out that not liking to write poses a real problem for a blogger.
One day, my mentor from Australia said, “Just outline and then record yourself talking through the outline, and have your VA transcribe that.” So I thought, “Sure, sounds legit! Let’s try that.”
It didn’t work.
I would write the outline and then try to record in front of the computer. The whole situation was so awkward that I would just get stuck and quit.
Then, Julie pointed out that when my mobile phone rings, I start walking with it while on the call – whether it’s around the house, outside the garden or a 5-mile walk.
I ALWAYS walk when I talk on the phone. So Julie asked, “Why don’t you try that for your show notes?”
And THAT works BEAUTIFULLY for me!
So I outline on Evernote, take my iPhone (remember to charge it!) walk outside, open up the note, tap on the first section, click the record icon, and just start talking. Not from a dictation state of mind, but from a conversation one.
Then I finish a section, click stop, scroll down the note, read the key points, click on the next sub-section, and record again. Rinse and repeat… and 45 minutes later – I have a 2,500 words post done!
I get back home, click on share button, send the link it generates to Rose, my VA, and For me, the writing is DONE.
Rose will take the audio notes, transcribe them, patch them up, and convert them into show notes. She will fix my grammar, break stuff into shorter paragraphs, adds bolds and italics and make everything look nice and sharp.
Ginger

We also use Ginger Grammar Check, which is a free online service that does an amazing work in checking your grammar. It puts me to shame very often 🙂
Unsplash, Deposit Photos and Fotolia
We love having photos in our posts, and Rose has 3 resources that she uses for Inspiring Innovation:
The first one is Unsplash. It’s a website that has beautiful photos that you can use 100% free. It doesn’t have search functionality; it’s not perfect, but it has beautiful photos that you can use right away without any Signup or anything.

![]()
If we can’t find suitable photos on Unsplash, we try DepositPhotos and Fotolia.
Libsyn
So far, we have an episode recorded and edited, we have show notes done, and all that’s left is uploading the MP3 file.

I export the file from Audcity, convert it to MP3 and add the tagging (the title, the description, the artwork — all of that) using iTunes and then upload it to our podcast hosting, which is Libsyn. There I copy in the show notes that Rose has created, and voilà – the episode is ready!
Canva
In order to great sharable artwork to promote the episode on social media, I go to Canva.com.

Canva is my graphic design tool of choice. It’s free and amazing. It comes with great templates for any type of graphics you’ll need online and allows literally anybody to become a genius graphic designer.
I simply LOVE it.
I also use Canva for episodes that include a lead magnet (like the one we had last week). I create both the download image and the graphic for the pop-up window (the opt-in window) within minutes with this tool.
List Building Through Podcasting
I often have downloadable PDFs as part of my episodes, and they double as lead magnets for my list.
I create these lead magnets the same way I’d create the show notes; I outline in Evernote, go for a walk , record it, get it transcribed and edited, and then create a PDF out of it.
iBooks Author
To create the PDF, I will either throw copy the text into Google Drive and export as PDF, or if I’m feeling artistic, I’ll use iBooks Author (Mac only, sorry Windows people!), which creates a drop-dead-gorgeous-looking PDF document for me to give away.
MailChimp and LeadPages
I use MailChimp as our mailing list provider.

The good thing about MailChimp is that you can start for 100% free. We used to use AWeber and I don’t have enough words how much a despise it. I strongly recommend that you start with MailChimp.
To deliver the lead magnet itself, as well as the opt-in form that works from within the show notes, I use LeadPages, and more specifically, a feature called LeadBoxes.

LeadBoxes are that pop-up box that pops up and asks for your email address when you click on a link to download one of our PDF resources.
When you fill-in the email and click “Download now”, LeadBoxes will add your email to the Inspiring Innovation mailing list on MailChimp, and then deliver the PDF you requested right away to your inbox.
Nifty 🙂
Spreading The Word
dlvr.it
After all this, Rose goes through all the information we have (keywords, final show notes, etc.) and creates a suggested social media swipe file — basically create a list of suggested tweets and Facebook status messages.
I will go over them (again, there’s a task in Asana reminding me to do that!), tweak them, and approve for scheduling.
Once I do that, she will take that swipe file and schedule it via dlvr.it – our social media scheduling tool.
The good thing about dlvr.it (and what made me pick it in the first place), besides allowing us to schedule all of our outgoing tweets, is that it also allows us to automatically tweet about new blog posts and new podcast episodes of anybody we want.
Automatically tweeting about new episodes of market leaders and friends is a great way to keep yourself on the top of their mind as someone who’s always looking to support their brand.
(To be honest, usually dlvr.it will pick up on their new episodes and tweet about it from my account even before they have a chance to tweet about it from theirs! So my tweet is almost always the first one they see. You could imagine the impact it has!)
Gmail Canned Responses and Boomerang
With all the social media scheduled on dlvr.it, we are almost done with an episode. The only thing left is to let my interviewee know that the episode is live.
While I want them to get an email from me once the episodes is live, I actually write the email to the interviewee ahead of time.

I have a template that I wrote and use through Gmail Canned Response and then I use another add-on called Boomerang, which allows me to schedule an email to be sent from Gmail on a later date. I simply set it and forget it!
Podcast Social Bookmarking
Finally, Rose will do social bookmarking on sites like Bibsonomy, Bitly, Delicious, Digg, Diigo, Reddit, StumbleUpon, Folkd, Jumptags, Newsvine and Technorati.
And that’s how we make an Inspiring Innovation Podcast episode!
Your Thoughts?
I would truly appreciate if you could leave me a comment, letting me know if this was helpful or if you’d like me to review in the future some of other tools that I use on a day-to-day basis.
Just leave your comment below.
I Need Your Help!
If you haven’t already, I would love if you could be awesome and take a minute to leave a quick rating and review of the podcast on iTunes by clicking on the link below. It’s the most amazing way to help the show grow and reach more people!
Leave a review for Meron’s podcast!
Affiliate Disclosure: Please note that some of the links above are affiliate links. There is no additional cost to you, and I will earn a commission if you decide to make a purchase.
Don’t Miss an Episode! Subscribe Below:


––– http://www.meronbareket.com/feed/podcast/ –––
Meron, another show, and you absolutely CRUSHED it! Great information, and all of it immediately useful, almost regardless of the stage of a person’s blog or podcast. I love the idea of the Google Canned Response (never knew about that!) I already use MailChimp, but DLVR.it is new to me as is Unsplash and Ginger. Great episode! Thanks!
Woohoo! Glad you found it useful, Trevor! 🙂 DLVR.IT has some room to improvement but I’m excited about where it’s going!
Wow, Meron, what a great guide you’ve provided with this episode. I think it’s always great to get to see “behind the scenes” for how someone does something, and you’ve really made it step-by-step here. I know I’ll definitely be referring back to this in the future. I’m just wondering how long it takes you to go from beginning to end of this whole process? I only wish I could afford a VA right now to help me when I’m doing this stuff! 🙂
Hey, Melissa 🙂 I’m over the moon that you enjoyed the episode! Woohoo! 🙂
For me – this process doesn’t take much… as long as I stick to my interview outline! Otherwise, editing can be quite time consuming.
For my VA, it’s probably 10-16 hours per episode (and being honest, she does the work that many people split to two VA’s – gVA and SEOVA)… because she rocks!
BUT – you don’t need ALL of the steps outlined in order to get started and launch successfully. I didn’t have all of these steps when I got started. Pick the steps that you feel will give you the biggest bang for your time, and don’t worry about the rest for now. You can always add steps later 🙂
The one thing I wish I done differently was to start using a project management system like Asana earlier. Creating the project templates that now I just duplicate every week / month made everything in IIP so much more organized and documented. This will help you make sure that when the cashflow allows, introducing your first VA, even if part-time VA, will be lot easier to do, compared to introducing them to a world of email madness (like the way it was when my first VA joined the team)
Thanks for your answer! It makes sense that you don’t have to have all these steps in place at first, because I think it could seem overwhelming that way, but rather that it’s more of something to strive for. Of course everyone should do what works best for them. Again, I’m really glad you showed us how you do things so that we can take away the things that will work best for us.
I’m looking forward for YOU to share how you got a content plan for the blog that seems to run like a Swiss watch! 🙂 What’s YOUR secrets, Melissa?
Haha, no secrets! I just commit to a schedule and make myself stick to it. Thanks for the compliment!
Meron I’m not the most energetic blog commenter but listened to this podcast today and it was packed with lots of gold nuggets that anyone would find useful if they’re considering recording a podcast. You motivated me to leave a comment here 🙂 so in my book that means I enjoyed it. Yes I’d love to hear some more of these behind the scenes type podcasts for some of your other projects. Keep the podcasts coming 🙂
Mark, seeing your name here has made me day! 🙂 I’m so glad this episode moved you and proved helpful! If I knew that’s what it would take – this would’ve been my episode #5! 🙂
Is there any specific project type you’re currently interested in? Membership site? General systemization / automation? Masterminds? Let me know and this time you won’t have to wait for 77 episodes! 🙂
Wondering – is managing an online business with Asana, with all the different project types etc. something that could interest you, Mark?